
Aurora Serverless v2
AWS has finally released the long-overdue Aurora Serverless v2! The latest and greatest on-demand relational database to rule them all. This database is a great match for highly unpredictable workloads that require a rapid ramp-up & down. There are two main reasons why I’ve decided to use Aurora Serverless v2, the first being that it can scale. The peace of mind that comes with knowing that it can handle anything you throw at it deserves its own article. In our case, being in a start-up where you are expected to deliver enterprise-grade quality to effectively compete with corporates that have much more workforce and resources to burn, Aurora Serverless v2 truly comes at the right time. A second pro that’s directly influenced by the enhanced scaling capabilities is a much more fine-grained expenditure. Additionally, compared to Aurora v1, v2 can scale alongside running SQL statements, which is quite useful during spontaneous continuous workloads.
The Serverless Stack Framework
To complement Aurora v2’s highly scalable and continuous availability, we’re using a somewhat underrated framework namely, The Serverless Stack Framework. It’s built upon the CDK and one of the core strengths of this framework is allowing developers to hot-reload during development. The underlying mechanics of this framework is explained in more detail later in this article but to make SST play nicely with Aurora Serverless v2, you will need to deploy some additional infrastructure to have it working properly (and securely) with resources that are hosted within a private VPC.
The Architecture
Create a New Project With SST
Select a template (I picked JavaScript starter) and install the dependencies.
Open the sst.json file located in the root of your project folder, modify the region (if necessary), and deploy your application.
Set the stage to dev, select a profile, or set AWS_PROFILE, and that's it!
The Debug Stack
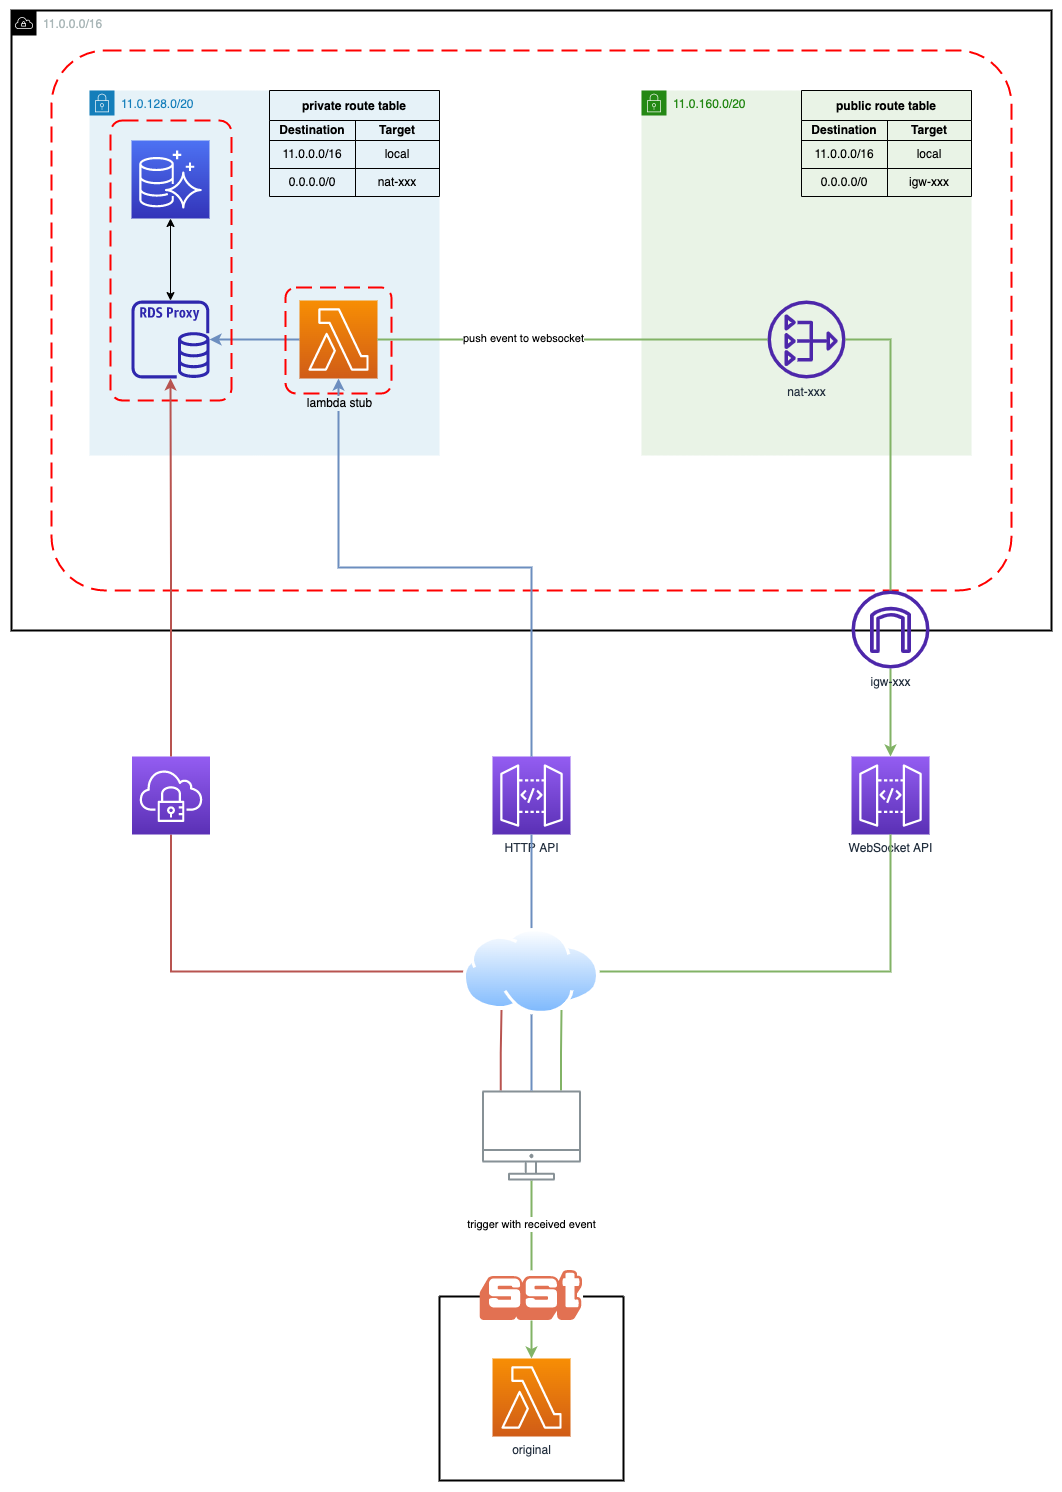
In addition to deploying the starter application (as defined in the MyStack.js), SST will also deploy a stub Lambda and a WebSocket API. This Lambda function relays events from the cloud to your local environment through a WebSocket API. The blue and green paths in the diagram display the flow of this development cycle.
After deployment finishes you should see the following prompt on your terminal.
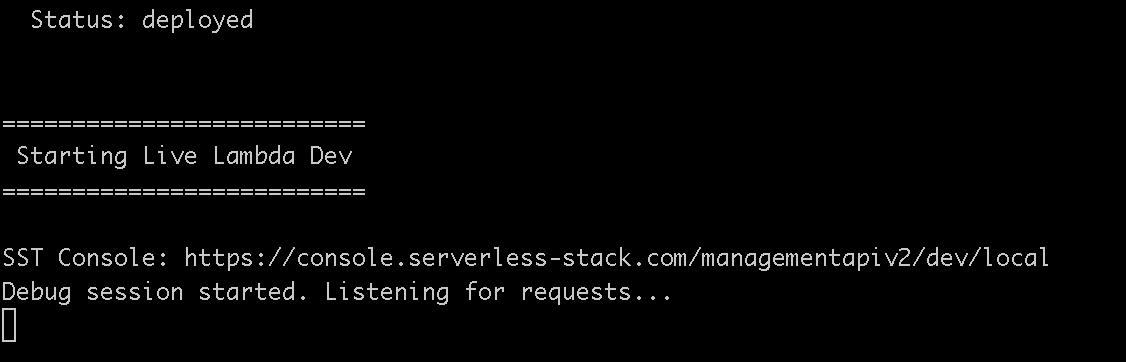
This means everything has been successfully deployed and SST is listening for incoming requests from your stub.
In the AWS console, navigate to the freshly deployed API and invoke it, you should see the following message in your browser.

Open up your terminal and you should see the following incoming message.

The log shown on your terminal is generated from invoking your Lambda locally with an event that originated from the stub.
Congratulations! The easy part is done, it’s time to set up our VPC with Aurora Serverless v2.
Create a VPC
We’re setting up a VPC with a minimum of two private subnets, both in different availability zones. Deploying your RDS instance in private subnets is the bare minimum you should do to keep your database safe.
Name: myVPC
- VPC CIDR range: 11.0.0.0/16 = 65536 IP addresses.
- Range: 11.0.0.0 to 11.0.255.255
Create Subnets
Create and attach 2 private subnets to the VPC, both subnets need to be in different availability zones.
Both subnets have a CIDR range of /20, meaning each subnet can have (2^(32–20)) = 4096 IP addresses.
Subnet A
- Name: myVPC-subnet-private1-<region>-1a
- CIDR: 11.0.128.0/20
- Range: 11.0.128.0 to 11.0.143.255
Subnet B
- Name: myVPC-subnet-private2-<region>-1b
- CIDR: 11.0.144.0/20
- Range: 11.0.144.0 to 11.0.159.255
Create a Security Group
Create a new Security Group for your Lambda function to link it to Aurora’s Security Group (which will be created later on). Create a rule allowing all traffic to flow in and out of the Security Group, and navigate to the corresponding Lambda function.
Create The Serverless Aurora V2 Instance
Database creation method: Standard create
Engine Options
Engine type: Amazon Aurora
Edition: I’m using MySQL but you can use whatever you want.
Replication: I chose a Single-master setup since there isn’t a strong need for a continuous write in my use case.
Engine version: At the time of writing, Aurora MySQL 3.02.0 (compatible with MySQL 8.0.23) is the only version that can be used for Serverless Aurora v2 with MySQL.
Settings
Name your DB cluster, choose/generate your DB credentials and store them in AWS Secrets Manager (needed for RDS proxy).
Instance Configuration
DB instance class: serverless
Capacity Range
At the time of writing 0.5 is the minimum capacity you need to configure for Serverless V2.
Determine the required capacity range for your application, for my use case, I do not expect a lot of spontaneous incoming traffic, so I will therefore be going with the lowest ACU capacity. This means that Aurora will scale down to 0.5 units and scale up to a maximum of 16 ACU, which is completely fine given the rapid scaling capabilities of Aurora v2.
Availability & Durability
In general, it’s recommended to have a multi-A-Z setup in place for production in the unlikely event of an outage or failure of an availability zone but I would not use this feature for general development as this will incur a higher monthly cost.
Connectivity
VPC: Select the previously created VPC with the corresponding private subnets.
Public access: Select “No”.
Subnet group: Create or choose an existing subnet group.
VPC Security group: Create a new Security Group specific to your Aurora instance.
Availability Zone: No preference
Database Authentication
I enabled password and IAM database authentication as I will be using IAM authentication for the RDS proxy we’ll be deploying later.
Additional Configuration
You can leave the default config for the most part but I’d highly recommend enabling Audit/Error/General and slow query logs.
Create the database!
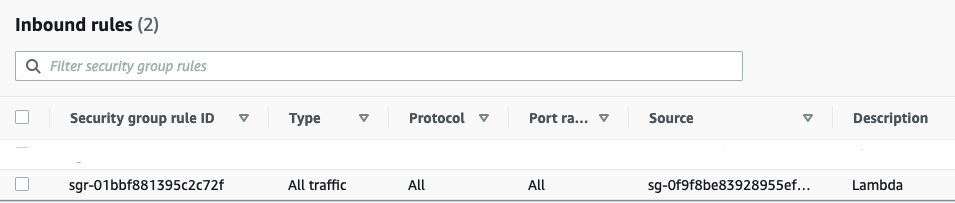
Update The Security Group Configuration
We need to update the Security Group to allow Lambda to communicate with the instance. Add an inbound rule as shown below.
Create an RDS Proxy
Why use an RDS proxy
Given AWS Lambda's stateless & ephemeral nature, it’s a best practice to let the RDS proxy manage your database connecting pooling. We don’t want to manage that in our Lambda functions if we don’t have to.
Proxy configuration
Proxy identifier: Name the proxy (name of the instance).
Engine compatibility: MySQL
TLS: true
Idle client connection timeout: Highly depends on your application’s needs but I’ve set mine for 2 hours.
Target Group Configuration
Database: Choose the previously created database.
Connection pool maximum connections: 100%
Connectivity
Secrets: Choose the previously created secret with the database credentials.
IAM role: Create an IAM role (this is the IAM role used to access the secret).
IAM authentication: Required (This means that you can only use IAM authentication to access the database through the proxy).
Subnets: Select the previously created private subnets.
VPC Security Group: Select the previously created Security Group.
Enable enhanced logging.
Setup a Client VPN Endpoint
One of the best ways to securely communicate with the private hosted resources within your VPC is to set up a Client VPN Endpoint.
Create The Certificates For Mutual Authentication
For the sake of this article, I will be using a certificate-based, mutual authentication method. This is fairly easy to set up but can be cumbersome if you have a lot of users you want to manage.
Before we create the VPN, we need to create the certificates and store them in ACM. → https://docs.aws.amazon.com/vpn/latest/clientvpn-admin/client-authentication.html#mutual
Details
Name: client-vpn-endpoint-1
The CIDR Range
This cannot overlap with the IP range set for the VPC.
Example
- CIDR: 192.168.128.0/22
- Range: 192.168.128.0 to192.168.131.255
Connection Logging
It’s recommended to log the connection details of clients, but you don’t have to, the log shows ingress and egress, client IP, and device IP, quite useful but not mandatory.
Create a log group and attach it to the VPN.
Authentication
The client and server certificates should’ve been created in the previous section and uploaded to ACM. Check on the mutual authentication option and select the server and client certificates from the drop-down.
Transport Protocol: Select UDP
Enable Split tunnelling (to not allow all traffic to go over the VPN).
Associate The VPC
Select previously created VPC.
VPN port: 433
That’s it! Create the VPN endpoint. After creation, it will have the pending association status but should change to available fairly quickly.
Associate The Subnets
Go to the target network associations tab and associate the previously created private subnets.
Create a Security Group
- Create an inbound rule Allowing all UDP traffic originating from connecting clients.
- Create an inbound rule that allows TCP connections between all network interfaces attached to the Security Group.

Authorization Rule
Since we’re using mutual authentication we can only allow access to all users.
Define the CIDR range that can be accessed by clients connecting through this VPN.
- 11.0.0.0/16 (All resources in the VPC)
Download a VPN Client
AWS client: https://aws.amazon.com/vpn/client-vpn-download/
Setting Up Your Profile
Download the client the configuration file from the console and store them somewhere safe.
Open the config file in your editor and add the cert and key (below the certificate right after </ca> tag) to the file.
Example
- cert ~/.vpn/certificates/client1.domain.tld.crt
- key ~/.vpn/certificates/client1.domain.tld.key
Save and add the profile to the VPN client and connect!
Test Your VPN
The first phase has been completed and you should be able to connect to your database using a database client.
Allow Outbound Traffic From Resources Within The VPC
By default, the stub is not deployed in your VPC. We need to configure it such that it can access the database and push an event to the WebSocket from within your private subnet.
NAT Gateway
Create A Public Subnet
VPC: Select the previously created VPC
Public subnet A
- Name: myVPC-subnet-public1-<region>-1a
- CIDR: 11.0.160.0/20
- Range: 11.0.160.0 to 11.0.175.255
Internet Gateway
Create and attach an internet gateway to your VPC.
Create The NAT Gateway
Subnet: Select the previously created public subnet
Connectivity Type: Public
Elastic IP allocation ID: Associate a new or existing Elastic IP address
Route Tables
Create a custom route table for your public subnet with a route to the internet gateway.

Update the route table of your private VPC subnet to point internet traffic to your NAT gateway (needs to be in the same availability zone as the NAT gateway).

The Final Stretch
We’re pretty much done and the only thing left is to configure a couple of resources before we’re ready.
Configure The Lambda Stub
We need to create a Security Group with a single rule, allowing all traffic.

Add The VPC Configuration
Attach the previously created VPC and Security Group, and add only one of the private subnets (as we only have one NAT gateway).

Update Aurora’s Security Group Configuration
Update the Security Group that is attached to Aurora & the RDS proxy with the following two inbound rules, to allow Lambda and connected VPN clients to communicate with the database instance.

Lambda Code
Create a database connector.
Lambda.js
Install And Deploy The Latest Changes
Done!
Invoke your API once more and watch the magic.
This article is written by Michael Fahim, our CIO. Follow him on Medium to stay updated on more content.